
Introduction
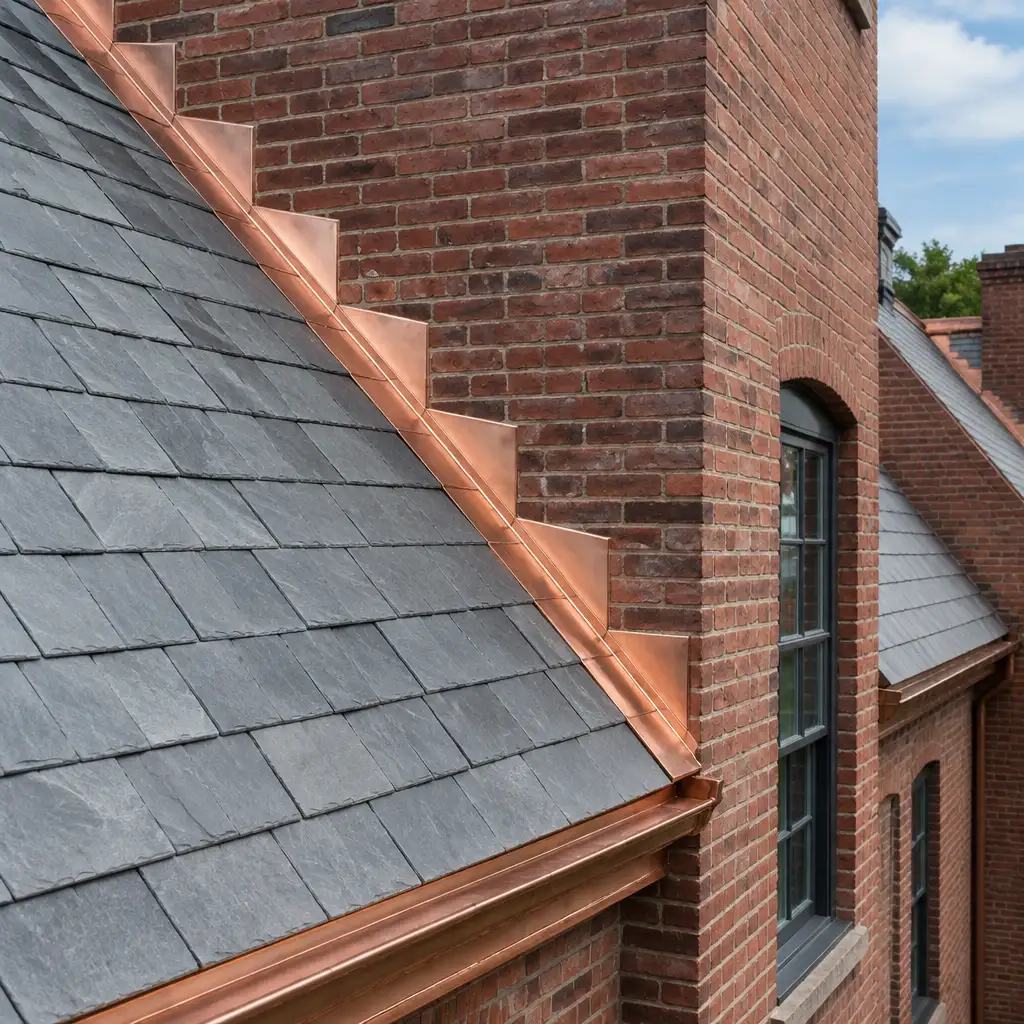
Restoration contractors working on historic buildings across Massachusetts and New England regularly encounter aged copper flashings that require careful evaluation and repair. This guide focuses on practical, trade-focused procedures for inspecting and repairing copper flashings, with attention to regional exposures found in Coastal Massachusetts and the Southcoast Massachusetts area. The target keyword for this article, copper flashing Massachusetts, appears throughout to keep the guidance contextually relevant for local projects.
Content is written for professional trades: roofing contractors, restoration specialists, architectural sheet metal contractors, and project managers. It assumes familiarity with roofing systems and historic preservation priorities, and emphasizes real-world checklists and fabrication-ready documentation. The guidance balances in-place repairs (solder and mechanical) with criteria for commissioning custom replacement flashings.
Key takeaways include a concise inspection checklist, common failure modes to watch for on historic properties, when to repair in place versus replace, practical solder versus mechanical repair strategies, and how to prepare clear documentation for fabricators. For related product and detailing references see our roofing panels and flashings resources for contractors.
Throughout the article we reinforce trade-only craftsmanship and custom fabrication options available to restoration teams working in Massachusetts. The recommendations reflect New England building practices and the durability considerations unique to coastal and historic structures.
- Introduction
- Common failure modes of aged copper flashings in New England
- Pre-inspection preparations and safety checklist
- Visual and hands-on inspection checklist
- Decision guide: repair in place vs commission custom replacement flashings
- Solder repairs vs mechanical repairs: techniques and trade-offs
- Documentation and fabrication-ready specifications for fabricators
- Frequently Asked Questions
Common failure modes of aged copper flashings in New England
Historic copper flashings often show a range of deterioration patterns that are distinct from newer installations. In Massachusetts, common failure modes include soldered seam fatigue, seam separation at exposed edges, abrasion and mechanical deformation from previous trades, and mortar or pointing damage where flashings interact with masonry. Salt-laden air in coastal areas accelerates some localized corrosion mechanisms and can lead to faster failure of adjoining fasteners and support details.
Another frequent issue is incorrect layering or improper laps installed in earlier repairs, which can trap moisture and accelerate underlayer degradation. Galvanic corrosion is less common with copper-to-copper details but can occur where copper interfaces with iron or steel anchors left in place; these contact points should be inspected carefully. Patina alone is not a failure—look for thin sections, pinholes, and loss of structural shape.
Material gauge and original seam type are important. Historic buildings frequently use heavier weights (16 oz or 20 oz) and specific seam profiles that must be preserved where possible. Failure may also stem from substrate rot or decayed nailers beneath the flashing, so evaluate the assembly as a system rather than just the visible metal.
Pre-inspection preparations and safety checklist
Before any hands-on inspection, assemble the necessary tools and safety equipment. At minimum bring a scaffold or secure ladder with fall protection, inspection mirrors, flashlights, digital camera for documentation, a magnet to detect ferrous fasteners, a moisture meter, and basic hand tools (pry bars, seamers, tin snips). Personal protective equipment should include gloves, eye protection, and appropriate roofing footwear.
Coordinate access with the restoration team and mason if the flashing interfaces with chimneys, parapets, or historic cornices. Where mortar or stonework will be disturbed, consult the preservation specifications before removal. Limit ladder work on high-slope roofs and always follow OSHA-compliant fall protection for roof access.
Plan a photographic survey that captures overall context, close-ups of seams, contact points with masonry, and any suspected leak locations. Note the existing copper weight (e.g., 16 oz, 20 oz, or 24 oz) and whether the copper is lead-coated. This pre-inspection step reduces surprises during repair and helps determine whether in-place repair is feasible or replacement is required.
Visual and hands-on inspection checklist
Begin with a full visual sweep from roof perimeter to interior termination points. Look for signs of water staining below flashings, corrosion at folds and seams, and evidence of movement or wind uplift. Pay special attention to soldered seams—check for cracks, brittle solder, and gaps. For historical solder joints, note whether the solder is original 50/50 tin-lead or a later material.
Perform hands-on checks where safe: gently probe suspect seams for softness, pull back loose counter-flashing where possible to inspect the backup, and test mechanical fasteners for corrosion. Use a magnet to locate steel anchors behind masonry; their presence can indicate a risk of galvanic interaction. Inspect the roof underlayment condition adjacent to the flashing—decayed underlayment often necessitates larger-scale intervention than simple metal repairs.
Document dimensional details: the length of continuous flashings, the extent of stepped flashings for walls, and the interface with chimneys and dormers. Note any irregularities in profile that indicate prior repairs or custom shapes which will influence repair methodology or shop-fabricated replacements.
Decision guide: repair in place vs commission custom replacement flashings
Deciding whether to repair in place or commission custom replacement flashings depends on damage extent, historic integrity, access, and expected remaining service life. Small localized failures—cracked solder at a seam, small pinholes, or split hem edges—are typically candidates for in-place repair when the surrounding copper is sound. Repairs preserve original fabric and are often preferred in preservation projects where matching historic workmanship is important.
Replace rather than repair when damage is widespread (multiple seams failing, systemic thinning of metal, or significant substrate deterioration), when the original flashing gauge cannot be matched on site, or where recurring maintenance will be impractical. Commission custom replacement flashings if the existing profiles are unique, the flashing interfaces require precise shop work, or when you need new pieces fabricated to measured drawings to match historic profiles and weights.
Factor in project schedule and budget: in-place repairs are faster and lower cost up front, but custom replacement fabricated to spec from a shop can provide a longer-term solution and cleaner detailing. For shop replacements and complex profiles, engage a trade-only copper fabricator early to review measured drawings and avoid costly field modifications. If you want assistance with custom components, contact Cape Cod Copper to discuss fabrication needs and lead times.
Solder repairs vs mechanical repairs: techniques and trade-offs
Solder repairs create continuous, watertight seams that are ideal for small seam cracks, split returns, and pinhole remediation. For historical structures, soldered seams can replicate original workmanship and maintain continuous water barriers. However, soldering requires surface preparation, heat control to avoid damaging adjacent materials, and appropriate solder selection to meet current code and preservation requirements.
Mechanical repairs—using tabs, cleats, stainless-steel fasteners, and hemmed overlaps—are preferable where future disassembly may be required, when heat application is unsafe, or when the substrate cannot accept torch work. Mechanical joins are also useful when pairing copper with dissimilar metals to allow for expansion and to avoid introducing lead-based solders. They often require precise shaping and may be completed faster than extensive soldering on complex profiles.
Choose solder for small, local repairs where the surrounding copper is thick enough to accept a new solder fillet and where the area can be isolated from combustibles. Choose mechanical repairs for extensive damaged lengths, for interfaces with masonry that require adjustability, or when restoration specifications prohibit hot work. When in doubt, document the preferred method and consult a fabricator for options that preserve historic detail while ensuring durability.
Documentation and fabrication-ready specifications for fabricators
When commissioning replacement flashings or requesting shop-made repair pieces, deliver clear, fabrication-ready documentation. Provide scaled measured drawings or templates, high-resolution photographs showing both overall context and critical junctions, and specific material requirements such as copper gauge (16 oz, 20 oz, 24 oz), lead coating, and seam profile. Include notes on desired seam types (e.g., flat lock, standing seam, hemmed edge) and whether you expect pre-patinated or mill finish delivery.
Indicate whether you prefer soldered seams or mechanical connections, and specify fastener types and locations. If the project is in a historic district, include preservation constraints regarding visible finishes and edge profiles. When sending field templates, mark orientation and elevation, and photograph the template against a scale for verification.
Clear documentation reduces shop rework and site modification. If a fabricator will form complex pieces—such as custom step flashings to integrate with stonework or radius details—include installation notes about expected tolerances and on-site adjustments. For partner fabricators and custom work, Cape Cod Copper works from drawings, photographs, or field measurements to produce precise components for restoration projects; provide full project context when requesting quotes.
Frequently Asked Questions
Q: How do I determine copper gauge on an existing flashing?
A: Measure thickness with a calibrated micrometer or compare a removed sample against known gauge swatches. Photograph the sample and note any markings. If removal isn’t possible, document seam profiles and panel spans for the fabricator; experienced fabricators can often infer gauge from profile and application.
Q: Is it acceptable to solder copper flashings on a historic brick chimney?
A: Soldering is acceptable where heat can be safely controlled and preservation specifications permit hot work. Shield adjacent masonry and combustible materials, and protect pointing. If hot work is restricted, use mechanically fastened counter-flashings or coordinate with the mason to create safe working conditions.
Q: What should I include in a job packet when requesting a replacement flashing from a shop fabricator?
A: Include measured drawings or templates, photographs showing the flashing context, specified copper weight, seam profile, expected finish, and a note on whether seams should be soldered or mechanically joined. Also provide installation constraints such as field tolerances, attachment substrates, and any historic preservation requirements.
Working from drawings, field measurements, or a custom detail? Cape Cod Copper partners with trade professionals to fabricate copper components made to fit the job, from custom flashings and roof panels to leader heads, chimney caps, vents, and decorative architectural details. Call (508) 946-1999 or email capecodcopper2@gmail.com to review your project requirements.