
Introduction
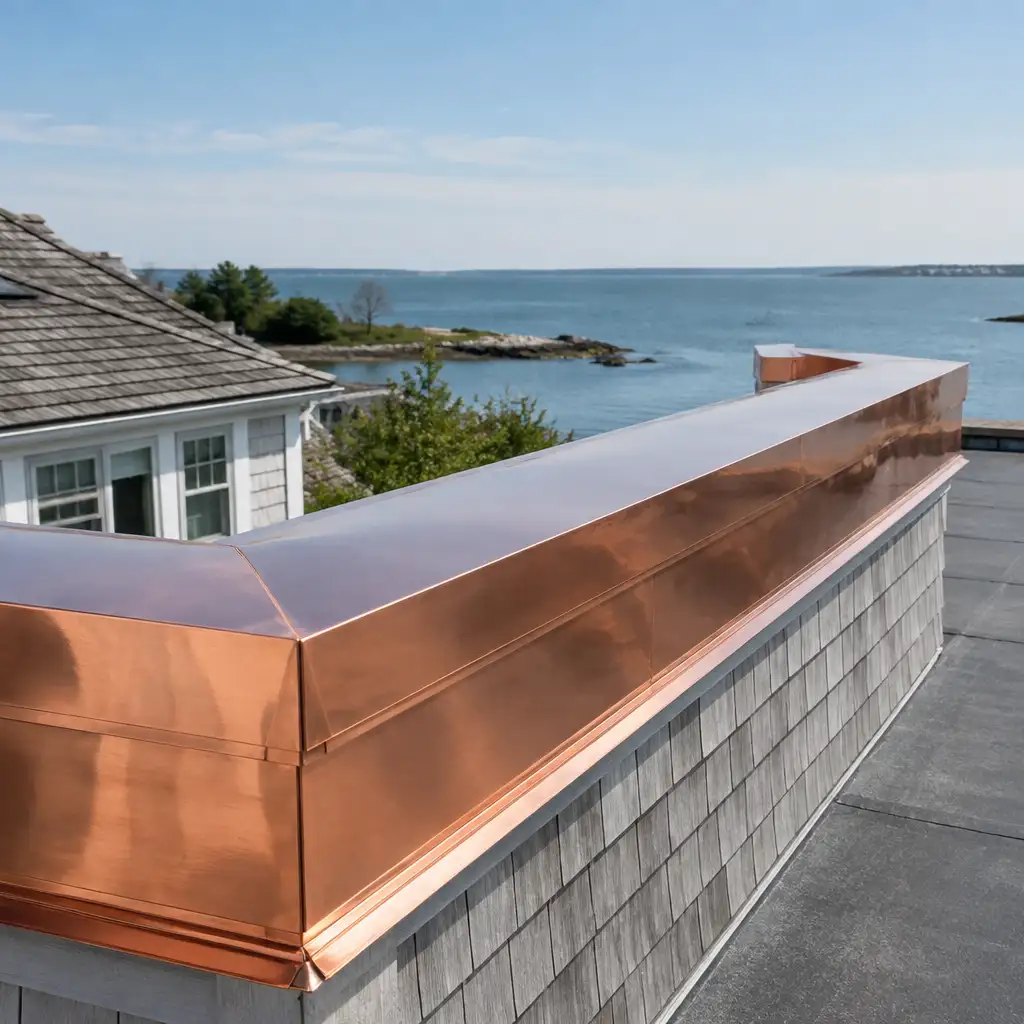
Parapet-to-coping transitions in coastal Massachusetts demand detailing that accounts for salt-air exposure, thermal movement, and long-term watertight performance. This article provides technical guidance for roofing contractors, architectural metal contractors, and restoration specialists specifying copper parapet flashings and coping caps for coastal projects. Use of copper in these conditions is common across Cape Cod and Southcoast Massachusetts because of copper’s longevity and proven performance when detailed correctly.
We focus on practical details: where to place slip joints, how to terminate counterflashing into masonry, preferred fasteners and isolation methods for dissimilar metals, and fabrication considerations to limit field adjustments. The guidance assumes trade-level execution and reflects fabrication capabilities such as CNC forming, roll forming, and precision soldering available from specialist shops.
This content references contractor workflows, shop-fabrication strategies, and installation best practices specific to New England coastal climates. It also discusses material choices—16 oz, 20 oz, and 24 oz copper—and when to consider lead-coated copper for historic restoration work. Copper flashing Massachusetts is the core topic; the recommendations below are tailored to professionals specifying and installing architectural copper in coastal New England.
For trade professionals needing prefabricated solutions, partner producers like roofing panels and flashings specialists can fabricate complex parapet details from shop drawings or field measurements, reducing on-site labor and risk of leaks.
- Introduction
- Design Principles and Performance Requirements
- Material Selection and Thickness Considerations
- Detailing Flashings at Parapet-to-Coping Joints
- Coping Cap and Termination Design
- Fabrication and Prefabrication Strategies
- Installation Best Practices and Quality Control
- Frequently Asked Questions
Design Principles and Performance Requirements
Parapet flashing in coastal Massachusetts must meet three core performance targets: watertight continuity, accommodation of thermal movement, and resistance to accelerated corrosion from salt-laden air. Achieving these simultaneously requires a combination of robust material selection, strategic joints, and durable termination methods into the primary wall and coping systems.
Designers should prioritize a flashing concept that creates a continuous, weathertight plane behind the coping with redundant drainage paths. Through-wall or concealed flashings tied into parapet suction drains and scuppers prevent water accumulation. Flashing profiles should direct water to the roof side, and where possible include drip edges to discourage capillary action along masonry faces.
Thermal movement is significant for copper roof and flashing assemblies, especially on long parapet runs and coping caps exposed to sunlight. Designs must include slip joints, expansion joints, or segmental coping lengths that allow metal to expand and contract without distressing soldered seams or masonry anchors. Combined, these strategies protect long-term performance for copper flashing Massachusetts projects subjected to New England seasonal cycles.
Material Selection and Thickness Considerations
Choose copper thickness based on expected service life, exposure, and structural requirements. For most parapet flashings and coping caps in coastal Massachusetts, 16 oz (0.0216″), 20 oz, and 24 oz copper are common. Thicker gauges offer greater rigidity for wide coping caps and reduce oil-canning on longer spans, but they increase weight and require heavier anchor systems.
Lead-coated copper remains a viable option for select historic restoration projects where compatibility with existing finishes or conservation specifications dictate its use. When specifying lead-coated materials, confirm surface treatments and any soldering or seam requirements with the fabricator to ensure compatibility with shop processes. Avoid specifying coatings that trap moisture between dissimilar materials.
Finally, specify corrosion-resistant fasteners—316 stainless steel is the standard for coastal projects. All fasteners should be isolated from dissimilar metals using neoprene washers or isolation tapes to prevent galvanic corrosion. Where copper interfaces with aluminum, steel, or painted metals, include an isolation layer in the detail and call for compatible sealants specified for use with copper and masonry.
Detailing Flashings at Parapet-to-Coping Joints
At the parapet-to-coping junction, prioritize a through-wall flashing that collects water from the coping and sheds it to the roof or scupper outlet. The through-wall flashing should be embedded at least 2″ into the backup wall and turned up inside the parapet return to form a positive lap. Tie counterflashing into a reglet or stainless steel anchor to avoid surface-fastened counterflashings that can leak over time.
Counterflashing into masonry reglets provides secure terminations. Where a reglet cannot be cut, use a face-mounted counterflashing secured with non-ferrous anchors and continuous sealant, but only as a secondary option. When designing the lap between coping cap and counterflashing, allow for at least a 2″ vertical overlap and a back-drafted drip to prevent wind-driven rain infiltration.
Include slip joints or expansion joints at regular intervals in continuous parapet runs. A typical approach is to break coping into manageable lengths (for example, 8–12 feet depending on gauge and expected movement) with an overlapping slip joint concealed under the upper coping or behind a saddle cleat. Ensure the joint detail allows vertical and lateral movement without exposing a direct water path into the structure.
Coping Cap and Termination Design
Coping caps serve both architectural and protective functions. The cap profile should extend adequately over the parapet face to direct water away from the wall while providing a sufficient top surface for pedestrian or wind loads where applicable. Hemmed edges, drip returns, and integrated downspout or scupper interfaces reduce water tracking and staining on façade materials.
Design termination points—scuppers, leader heads, and downspout connections—to align with the building’s rainwater management system. Coordinate with the project’s drainage design so that parapet scuppers tie into the roof drainage system without creating bottlenecks. Where parapet scuppers are used, reinforce the copper with internal flanges or backing plates at the scupper penetration to prevent deformation and ensure long-term sealing.
For watertight seals at terminations, prefer mechanical securement and soldered seams over reliance on sealants alone. Soldered corner seams and riveted or soldered laps created in the shop give better long-term performance in salt-air environments than field-applied adhesives. If field soldering is required, protect adjacent masonry and finishes and follow safe hot-work protocols.
Fabrication and Prefabrication Strategies
Shop-fabrication reduces on-site labor, welding/soldering in variable conditions, and potential for mistakes. Provide the fabricator with measured drawings, profiles, and elevation data so parapet caps and flashings can be prefabricated as full-length assemblies or modular kits. Prefabrication minimizes field seams and speeds installation, which is particularly valuable on coastal projects with short installation windows due to weather.
Cape Cod Copper and other trade-only fabricators offer CNC forming, roll-forming, and precision seaming to produce repeatable coping caps and parapet flashings. When specifying prefabricated units, include connection details for field attachment, spacing of anchors, and locations of slip joints. Ask the fabricator about pre-punched anchor locations and integrated cleats to ensure each piece installs cleanly and aligns with the substrate anchors.
Supply specifications should state whether seams are to be soldered, folded-back, or standing-seam locked depending on access and anticipated movement. For coastal exposures, consider factory-tinned soldering at critical seams to improve initial wetting and reduce the chance of incomplete field solder joints. Coordinate any finish or protective handling requirements with the fabricator to avoid corrosive contamination during storage, transport, or site staging.
Installation Best Practices and Quality Control
Installation quality control starts with a clear set of shop drawings and a mock-up when project risk is high. Accept mock-ups that demonstrate coping fit, anchor performance, and weathertight transitions at corners and scuppers. On-site, verify substrate tolerances, wall plumbness, and reglet alignment before installing flashings or coping caps.
Use stainless steel anchors and avoid penetrating primary waterproofing membranes where possible; where penetration is necessary, flash each fastener with a compatible sealant and an isolation washer. Ensure that the installer follows specified spacing for anchors and that fasteners engage solid substrate or blocking rather than thin veneer. Where through-bolts are used, include neoprene gaskets, back-up plates, and proper torque specifications in the installation instructions.
Post-installation, document field conditions with photographs showing laps, slip joints, and terminations. Provide owners and general contractors with maintenance-friendly details—e.g., scupper access and scupper outlet screening—to preserve system performance. For additional fabricated components such as chimney caps, leader boxes, and vents, coordinate with relevant trades to maintain continuity across roof penetrations; see examples of custom components and accessories from fabricators who supply copper chimney caps and vents.
Frequently Asked Questions
Q: What copper gauge is recommended for parapet coping in coastal Massachusetts?
A: For most coastal parapet coping, 16 oz to 24 oz copper is used depending on span, rigidity needs, and expected abrasion. Heavier gauges (20–24 oz) suit wide coping caps and exposed runs, while 16 oz is appropriate for narrower caps or less structural demands. Specify stainless anchors and consider prefabrication to control fit and finish.
Q: How should thermal movement be accommodated in long parapet runs?
A: Break long coping runs into shorter segments with concealed slip joints or expansion joints. Typical segment lengths vary by gauge and exposure, but 8–12 foot segments are common. Use overlapped slips, saddle cleats, or hidden lap details that allow lateral and vertical movement without exposing a direct path for water.
Q: Can Cape Cod Copper fabricate parapet flashings from project drawings and field measurements?
A: Yes. Cape Cod Copper operates as a trade-only fabricator and can produce custom parapet caps, flashings, and related components from measured drawings, specifications, photographs, or field templates. For project inquiries, contact the shop to review fabrication lead times and required documentation.
Working from drawings, field measurements, or a custom detail? Cape Cod Copper partners with trade professionals to fabricate copper components made to fit the job, from custom flashings and roof panels to leader heads, chimney caps, vents, and decorative architectural details. Call (508) 946-1999 or email capecodcopper2@gmail.com to review your project requirements.