
Introduction
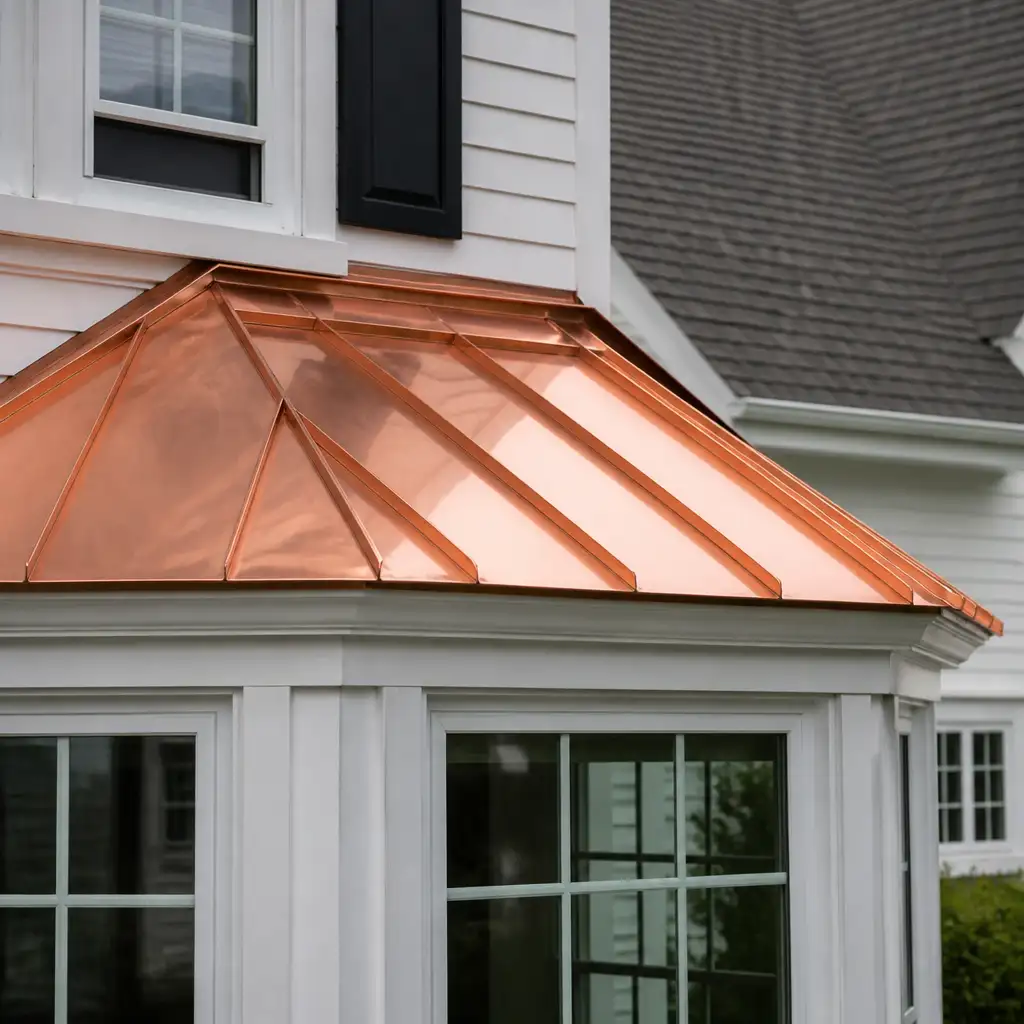
This guide is written for roofing contractors, architectural metal fabricators, and restoration professionals planning the installation of roll-formed copper bay window roofing panels in Cape Cod and coastal New England conditions. It focuses on practical, trade-oriented planning: templating methods, roll-form tolerances, allowances for thermal movement, appropriate underlayment choices, and field-fastening strategies specific to bay window roof geometry.
Bay windows present a unique combination of compound geometry, short panel runs, and exposure to wind-driven rain and salt air. Proper planning reduces callbacks, simplifies on-site adjustments, and protects your fabrication tolerances. Throughout this article we use the term copper roof panels to mean factory roll-formed and site-assembled standing seam or custom panel profiles commonly used on small roofs and bays.
Cape Cod Copper provides fabrication and technical coordination for contractors and suppliers; if you need shop input on panel profiles, seam types, or pre-fab tolerances, see our page on roofing panels and flashings for product examples and typical applications. The guidance below is experience-based and intended to support professional trades working in Massachusetts and coastal Massachusetts climates.
Key takeaways: plan templates early, communicate roll-form tolerances with your fabricator, design for thermal movement, select underlayments and separation layers compatible with copper, and specify floating clip systems or concealed fasteners appropriate for small-radius bay conditions.
- Introduction
- Job planning and templating for bay window copper roof panels
- Roll-form tolerances and specifying panel profiles
- Accounting for thermal movement and expansion joints
- Underlayment and substrate recommendations for Cape Cod conditions
- Field-fastening strategies and clip selection for bay roofs
- Site measurement and prefabrication coordination checklist
- Frequently Asked Questions
Job planning and templating for bay window copper roof panels
Start with a full job plan that documents roof geometry, transitions, and interfaces at the face of the bay, fascia returns, and eave junctions. Bay window roofs can be polygonal or curved: identify whether the bay will be built with straight faceted panels or with true curved panels. This affects whether you order roll-formed straight panels with mitered seams or request pre-curved panels from the shop.
Templates are critical for accurate fit. For faceted bays, field-measure every run length and ridge/valley intersection, noting roof pitch at each facet and the exact distance to vertical control points such as window head casings or trim. For true curved bays, provide the fabricator with radius measurements taken at the sub-fascia, centerline of panel, and eave. Photographs, measured drawings, and paper or cardboard templates help minimize back-and-forth during fabrication.
Coordinate flange details for drip edges, fascia returns, and transition flashings early. Specify where panel seams will terminate, whether custom apron flashing or counterflashing is required at vertical walls on the bay, and how the panels will interface with adjacent materials such as brick, wood clapboard, or trim. Early coordination reduces rework and ensures the fabricator can set seams and hem details that match field conditions.
Roll-form tolerances and specifying panel profiles
Roll-form tolerances directly affect onsite fit for bay window panels. When you request roll-formed copper roof panels, specify overall panel width and any critical seam dimensions, and ask the fabricator to confirm shop tolerances. Typical practice is to agree acceptable dimensional variances and straightness before cutting—fabricators often specify width tolerance and camber limits to maintain seam engagement on site.
Panel profile choice matters: small standing-seam profiles with a low seam height are easier to dress around fascia and cornice work, while taller seams increase water-shedding capability but may be harder to form on tight radii. For bay roofs expect to balance profile aesthetics with formability; provide the fabricator with the intended seam type (snapped, folded, or mechanically seamed) so tooling and roll-form dies can be selected appropriately.
Request documented tolerances from your fabricator before production. A practical shop tolerance for short roll-formed runs is often tighter than field-made panels—confirm flatness and edge straightness over the installed length. If you anticipate on-site adjustments, plan for modest trimming and hemming at panel ends rather than relying on excessive field manipulation that can distort seams.
Accounting for thermal movement and expansion joints
Copper exhibits measurable thermal expansion over even short runs. In practical terms, allow for approximately 0.012 inch per foot for a 100°F temperature range (order-of-magnitude guidance—confirm exact values with your engineer and fabricator). For bay roofs, which often have short panel lengths, thermal movement is still important: repeated cycles of solar heating and night cooling on Cape Cod can cause panel movement that stresses seams and clips over time.
Design clip systems and end details to accept lateral movement. Floating (sliding) clips and concealed clip systems are industry-preferred because they secure the panel without restraining thermal expansion. When panels are seamed into rigid terminations, include expansion joints in transitions to vertical walls, backs of gutters, and at long eave runs. For short bay panels, stagger seam terminations and avoid continuous fixed fasteners at both ends of a run.
Coordinate movement allowances with the fabricator. If you pre-fabricate long single-piece panels, specify restrained zones and clip spacing so the shop can deliver panels with the correct edge conditions and pre-punched clip slots. In coastal Massachusetts, design to prevent cumulative movement loads from concentrating at corners and the ends of bay returns.
Underlayment and substrate recommendations for Cape Cod conditions
Select underlayment systems that manage moisture while protecting copper from staining and galvanic reactions. In coastal Massachusetts, prioritize breathable, non-asphaltic synthetic underlayments or polymeric membranes that will not transfer asphaltic oils onto copper surfaces during installation. Use self-adhering membranes rated for metal roofing at critical locations such as eaves, valleys, and step flashings; where asphaltic membranes are necessary, specify a separation layer between the membrane and copper.
Provide a slip-sheet or separation layer where copper will be in contact with pressure-treated wood, certain fasteners, or dissimilar metals. Common practice is to use a non-woven, non-reactive roofing underlay or building paper as a sacrificial layer that prevents staining and reduces corrosion risk. Also confirm that roof sheathing is dry and flat; uneven substrate will complicate seam engagement on short bay panels.
Ventilation and substrate drying are relevant for longevity. Avoid trapping moisture at the bay intersection; ensure flashings and drip edges are detailed to shed water away from the wood substrate. Where historic restoration is involved, coordinate material choices to match existing profiles while meeting current performance expectations for coastal exposure.
Field-fastening strategies and clip selection for bay roofs
Choose fasteners and clip systems compatible with copper and climate. Copper-to-fastener compatibility is critical: use copper fasteners where feasible, or use 316 stainless steel if copper fasteners are not practical. Avoid standard galvanized fasteners in direct contact with copper to prevent galvanic corrosion and staining. Fasteners should be placed through clips into load-bearing substrate—not through the panel face—so the panel remains free to expand.
Clip spacing depends on wind loads, panel profile, and roof pitch. For small bay roofs, increase clip density at corners, ridges, and eave transitions to prevent uplift while maintaining sliding capacity for thermal movement. For curved bays use narrower clip spacing and panels with tighter seam engagement; for faceted bays, locate clips near the seams and stagger them between adjacent panels to minimize concentrated stress.
When field-seaming is required, use calibrated seaming tools and a trained seamer to assure complete engagement without overworking the metal. For snapped or mechanically seamed profiles, confirm panel straightness and seam alignment prior to seaming. Protect finished copper from damage during installation with soft pads and limit foot traffic; consider installing planking to distribute loads over panels during the remainder of the roof work.
Site measurement and prefabrication coordination checklist
Below is a practical checklist to use before placing your order with a fabricator. Use it to reduce questions and revisions and to ensure prefabricated panels fit correctly on site:
- Confirm panel strategy: faceted vs. true curved panels; specify seam type and profile.
- Measure and record all run lengths along the plane where the panel will sit; include pitch for each facet and distances to trim lines and vertical controls.
- Create physical templates for complex intersections (cardboard or paper templates) and photograph mounting conditions from multiple angles.
- Note substrate type, thickness, and condition; document any required sheathing replacement or leveling.
- Identify termination points: eave drip, fascia returns, apron flashings, and vertical wall interfaces; indicate where expansion joints will be located.
- Specify clip type and spacing, fastener type and embedment depths, and whether pre-punching of clip slots is required.
- Confirm underlayment plan, including separation layers where copper meets asphaltic membranes or treated wood, and locations for self-adhering membranes.
- Provide fabricator with measured drawings, templates, and preferred tolerances; request written confirmation of roll-form tolerances and production schedule.
- Plan for transport and staging: long panels require protection for shipping and careful handling on site; coordinate delivery times with project sequencing.
- Schedule a pre-install meeting with the fabricator and on-site crew to review details and any potential field modifications before panels are produced.
When you are ready to move from planning to shop order, contact Cape Cod Copper to discuss fabrication specifics and tolerances. If you need a quote, use the contact Cape Cod Copper page to request guidance on profile selection, clip systems, and production lead times.
Frequently Asked Questions
Q: How should I allow for copper expansion on short bay roof panels?
A: Design with floating clips and avoid fixed fasteners at both ends of a run. For planning purposes, use an approximate expansion allowance of 0.012 inch per foot for a 100°F change when laying out clip slots and end conditions, and confirm exact values with your fabricator and engineer.
Q: Can roll-formed copper panels be curved for a true radius bay?
A: Yes. Fabricators with roll-form and radius-form capabilities can produce pre-curved panels, but you must provide accurate radii, centerlines, and substrate conditions. Curved panels typically require tighter tolerances and closer coordination between field templates and shop production.
Q: What underlayment should I use under copper roof panels in coastal Massachusetts?
A: Use a high-quality synthetic underlayment with self-adhering membranes at eaves and critical junctions. Where asphaltic membranes are used, specify a non-reactive separation layer between membrane and copper to avoid staining; document the plan in the shop drawings so the fabricator can detail returns and drip edges accordingly.
Working from drawings, field measurements, or a custom detail? Cape Cod Copper partners with trade professionals to fabricate copper components made to fit the job, from custom flashings and roof panels to leader heads, chimney caps, vents, and decorative architectural details. Call (508) 946-1999 or email capecodcopper2@gmail.com to review your project requirements.